Sourdough Cheese Bread (Crusty Dutch Oven Cheddar Loaf)
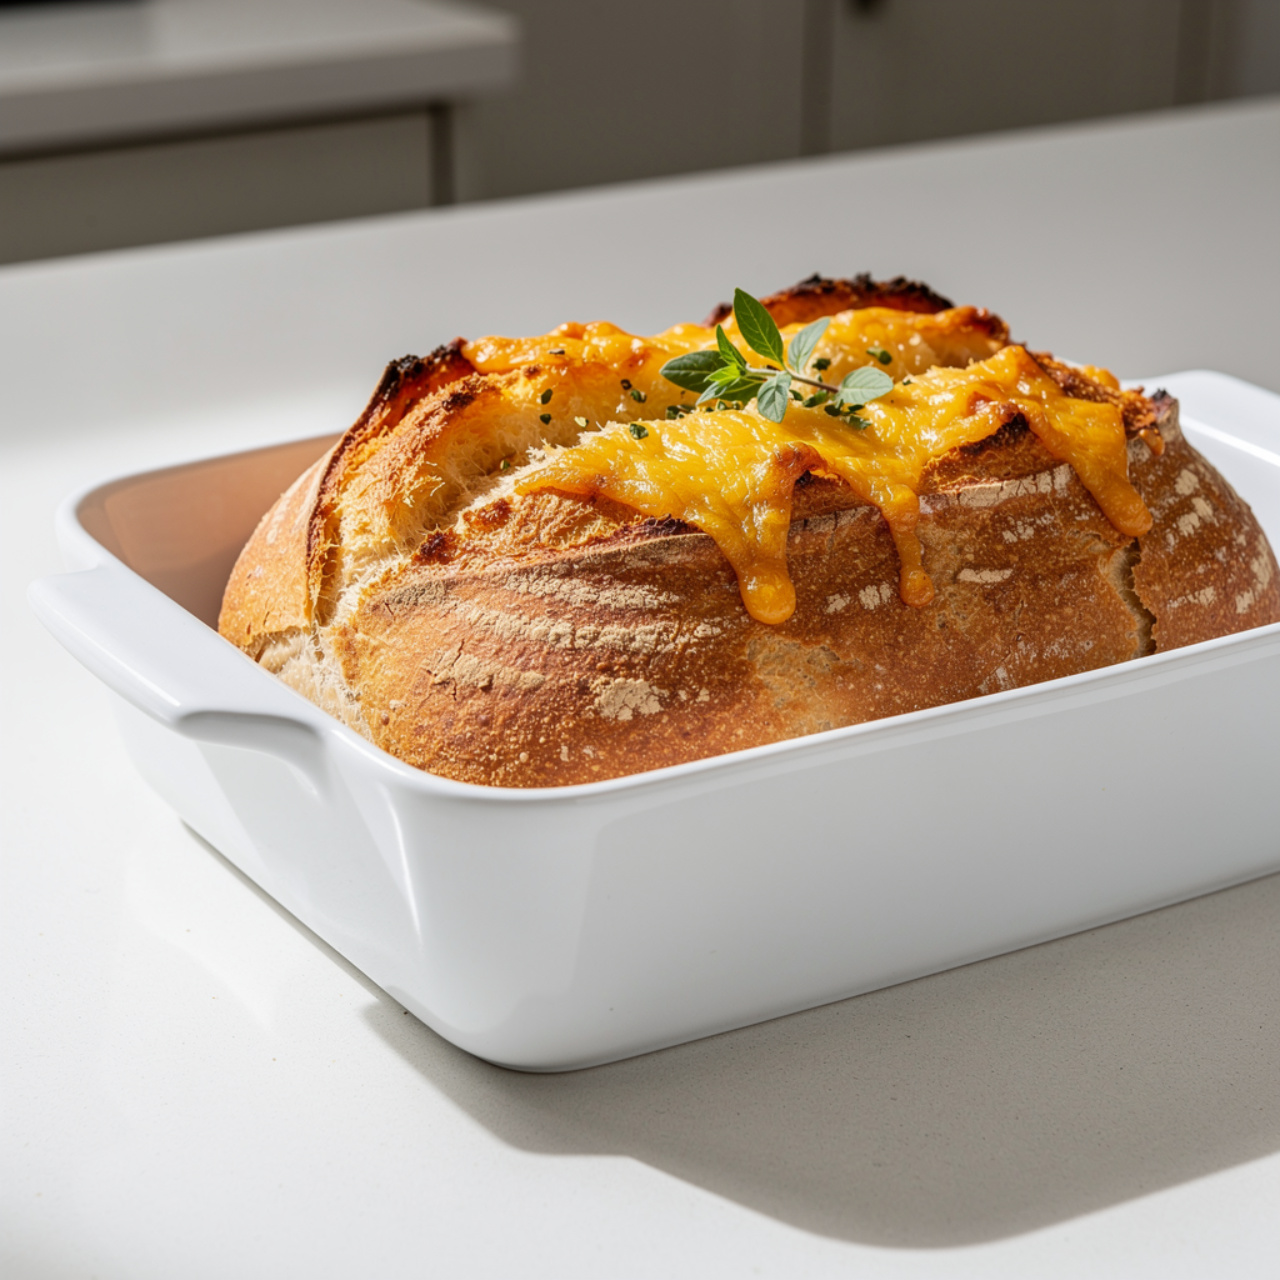
This sourdough cheese bread bakes up with a shatteringly crispy crust, a chewy open crumb, and molten pockets of sharp cheddar throughout. Made in a Dutch oven for that bakery-quality rise every single time.

The Sourdough Cheese Bread You Will Make on Repeat
There is a moment, about 25 minutes into the bake, when you pull the lid off your Dutch oven and the kitchen fills with the smell of caramelizing cheddar and tangy sourdough, and you just know it is going to be one of those loaves. The kind people ask about. The kind you photograph before you even cut into it.
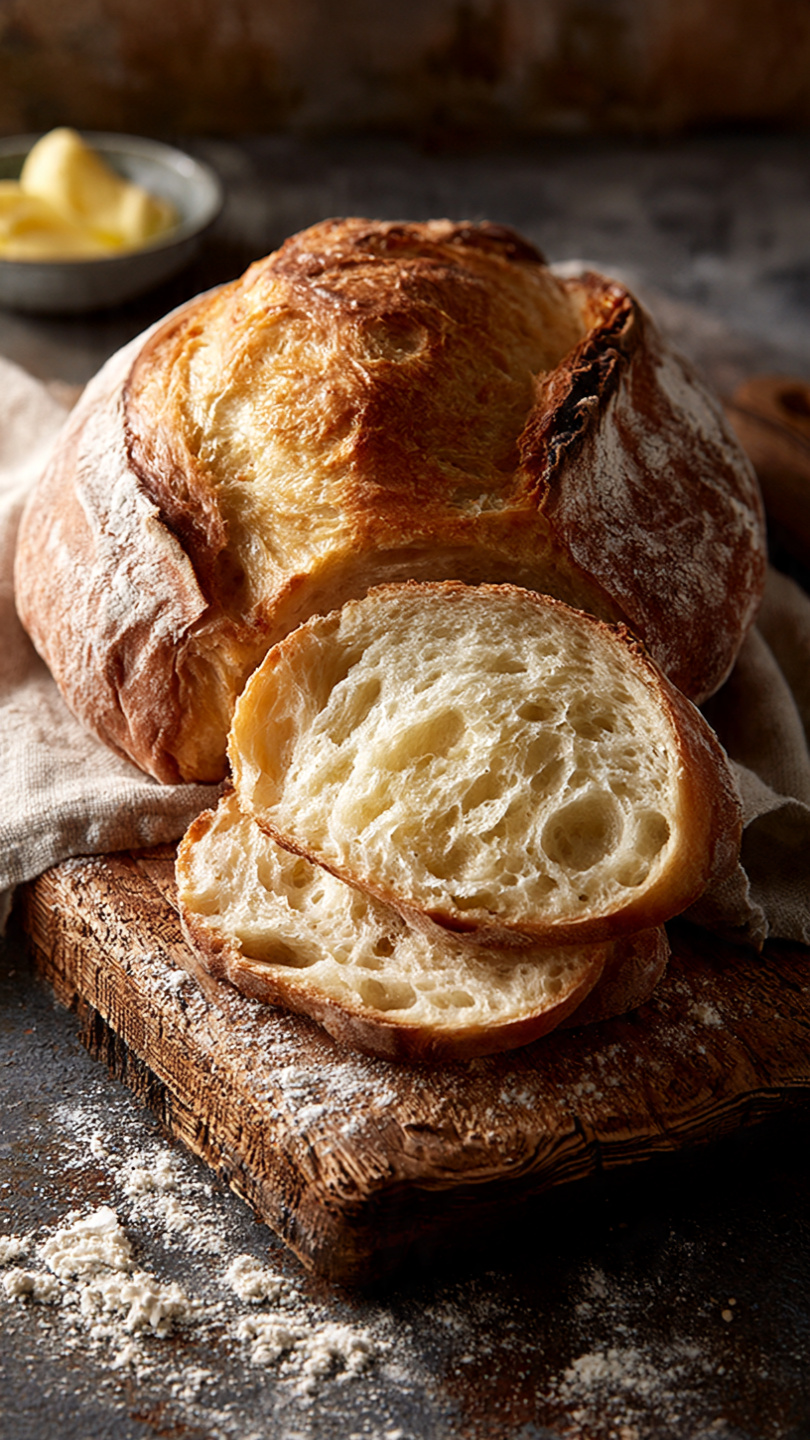
This Dutch oven cheese bread recipe delivers exactly that. A shatteringly crispy, deeply bronzed crust. A chewy, open crumb with those gorgeous irregular holes sourdough bakers chase. And molten, golden pockets of sharp cheddar woven through every single slice. It is everything a cheddar bread recipe should be, elevated by the slow magic of sourdough fermentation.
Whether you call it a cheddar pretzel sourdough loaf, a cast iron Dutch oven bread, or simply "that cheese bread," this is the loaf that earns its place in your regular rotation.
Why Sourdough Changes Everything
You could make a quick yeasted cheddar bread and it would taste good. But sourdough does something that commercial yeast simply cannot replicate. The long, slow fermentation develops a complexity of flavor, a gentle tang that plays beautifully against the sharpness of aged cheddar. The crumb becomes more open, more chewy, more satisfying.
The other thing sourdough does is give you time. The bulk ferment and cold proof fit around your schedule rather than demanding your full attention. Mix it in the evening. Shape it before bed. Bake it in the morning. This is one of those easy bread recipes in a Dutch oven that genuinely rewards patience.
Baker's Note: Your starter is the engine of this recipe. Use it when it is at peak activity, meaning it has roughly doubled after feeding and looks bubbly and domed. A sluggish starter will result in a dense, under-risen loaf. When in doubt, give it another feed and wait.
The Cheese Question
Sharp cheddar is the classic choice here, and for good reason. It melts into the crumb beautifully, adds a bold savory punch, and caramelizes on top of the loaf into those irresistible golden-edged bits. Always shred your own from a block rather than using pre-shredded cheese. The anti-caking agents in bagged shredded cheese prevent it from melting as smoothly.
That said, this recipe is built for Dutch oven bread variations. A few worth trying:
- Gruyere and caramelized onion for a French onion soup vibe
- Smoked gouda and chive for something a little more subtle
- Pepper jack and pickled jalapeno for a loaf with serious heat
- Half cheddar, half parmesan for an extra-salty, deeply savory crust
The same method applies no matter which cheese you choose. Stick with firm, low-moisture cheeses for the best result.
Tools That Genuinely Make a Difference
Getting the right tools dialed in before you bake makes this process so much smoother. A quality cast iron Dutch oven, a sharp bread lame, and a proper banneton basket are not just nice to have. They are the difference between a loaf that looks homemade and one that looks like it came from a serious bakery.
The Dutch Oven Is Non-Negotiable
If you have ever wondered why bakery sourdough has that crackly, blistered crust and your home loaves do not, the answer is steam. Professional deck ovens inject steam during the first phase of baking, which keeps the crust pliable long enough for the loaf to fully spring open before it sets.
A cast iron Dutch oven with lid replicates this perfectly. The trapped moisture from the dough itself creates a steamy environment inside the covered pot, giving you that dramatic oven spring and glossy, crackling crust. This is why every great bread recipe in a Dutch oven calls for that covered bake first, then the lid comes off to brown and caramelize.
Preheat your Dutch oven inside the oven for at least 45 minutes before baking. It needs to be genuinely screaming hot. Dropping cold dough into a cold pot is the single most common mistake in Dutch oven bread baking.
Safety First: A 500-degree cast iron Dutch oven is extremely dangerous. Use thick oven mitts, work deliberately, and keep pets and kids out of the kitchen during the transfer.
Scoring and the Final Touches
Scoring is not just decorative. It controls where the bread opens during oven spring. Without a score, the loaf will burst unpredictably from its weakest point. One confident slash at a slight angle, or a simple cross, is all you need. Use a bread lame or a sharp razor blade, and move quickly with confidence. Hesitant, shallow scores drag on the dough and deflate it.
Right before it goes in, scatter the remaining cheddar over the top and finish with a pinch of flaky sea salt. The cheese on top will bubble, brown, and form a crackly cheese crust that makes every slice look incredible.
Get This Bread on Your Table
You have made it through the bulk ferment, the cold proof, the preheat. Now it is time for the best part. Here is everything you need to bake this loaf from start to finish:
Sourdough Cheese Bread (Crusty Dutch Oven Cheddar Loaf)
This sourdough cheese bread bakes up with a shatteringly crispy crust, a chewy open crumb, and molten pockets of sharp cheddar throughout. Made in a Dutch oven for that bakery-quality rise every single time.
Ingredients
- 1/2 cup active sourdough starter, fed and bubbly, at peak activity
- 1 1/4 cups warm water, around 80 degrees F
- 3 1/4 cups bread flour, plus more for shaping
- 1 1/2 tsp fine sea salt
- 1 1/2 cups sharp cheddar cheese, freshly shredded, divided
- 1/2 tsp garlic powder, optional, but highly recommended
- 1 tsp flaky sea salt, for topping before baking
Instruction
In a large bowl, whisk together the bubbly sourdough starter and warm water until fully combined and slightly frothy.
Add the bread flour, fine sea salt, and garlic powder. Mix with a sturdy spatula or your hands until no dry flour remains. The dough will feel shaggy and rough at this stage. Cover and rest for 30 minutes.
Perform the first set of stretch-and-folds: wet your hand, grab one side of the dough, stretch it up as high as it will go without tearing, then fold it over the center. Rotate the bowl 90 degrees and repeat 3 more times. That is one set. Cover and rest 30 minutes.
Repeat the stretch-and-fold process 3 more times at 30-minute intervals for a total of 4 sets over 2 hours. After the final set, the dough should feel noticeably smoother and stronger.
Scatter 1 cup of the shredded cheddar over the dough. Fold the dough over the cheese repeatedly until mostly incorporated. Some visible pockets of cheese are perfectly fine.
Cover the bowl tightly and let the dough bulk ferment at room temperature (70 to 75 degrees F) for 4 to 6 hours, until it has grown by about 50 to 75 percent and looks airy and domed.
Lightly flour a clean work surface. Gently turn the dough out and shape it into a round boule by folding the edges toward the center, then flipping it seam-side down. Use your hands to create surface tension by dragging it gently across the counter.
Place the shaped loaf seam-side up into a floured banneton basket or a bowl lined with a well-floured kitchen towel. Dust the exposed surface with a little flour, cover loosely with plastic wrap, and refrigerate for 8 to 16 hours for the cold proof.
When ready to bake, place your Dutch oven with its lid inside the oven and preheat to 500 degrees F (260 degrees C) for at least 45 to 60 minutes. This is the most critical step for a great crust.
Cut a sheet of parchment paper to fit your Dutch oven. Turn the cold dough out onto the parchment, seam-side down. Quickly scatter the remaining 0.5 cup of cheddar over the top and sprinkle with flaky sea salt.
Score the top of the loaf with a sharp bread lame or razor blade in one confident slash or a cross pattern. This controls the direction of the oven spring.
Carefully remove the screaming-hot Dutch oven from the oven. Lower the dough in using the parchment paper as a sling. Cover with the lid and bake for 20 minutes.
Remove the lid and continue baking for 25 to 30 more minutes, until the crust is a deep, mahogany brown and the cheese on top is caramelized and bubbly.
Lift the bread out using the parchment and transfer to a wire rack. Resist cutting into it for at least 1 hour. The crumb is still setting as it cools, and cutting too early will result in a gummy interior.
Equipment
- Large mixing bowl
- Bench scraper
- Banneton proofing basket or 9-inch bowl with a kitchen towel
- 5.5-quart cast iron Dutch oven with lid
- Bread lame or sharp razor blade
- Parchment paper
- Wire cooling rack
- Kitchen scale (recommended)
Notes
Serving, Storing, and Sharing
Let the loaf cool on a wire rack for a full hour before slicing. This is genuinely one of the hardest parts of the recipe. The crumb needs that time to finish setting, and cutting too early will leave you with a gummy, collapsed interior no matter how well the bake went.
Once cooled, this bread is stunning served simply with good salted butter. It also pairs beautifully alongside a pot of tomato soup, a hearty stew, or a charcuterie spread where it can anchor the whole board. Thin slices make extraordinary toast. Thick slices make extraordinary grilled cheese.
For storage, wrap the cut loaf loosely in a clean kitchen towel and keep it at room temperature for up to two days. For longer storage, slice and freeze. Frozen slices reheat in a hot oven in under 10 minutes and taste remarkably close to fresh-baked.
This is the kind of sourdough cheese bread that gets requested by name. Make it once, and you will understand why.