Rustic Italian Yeast Bread (Crispy, Crusty, and Homemade)
This rustic Italian yeast bread bakes up with a shatteringly crispy crust and a soft, chewy crumb — all from simple pantry staples and a Dutch oven. The easiest artisan bread recipe you will ever make at home.

The Only Rustic Italian Yeast Bread Recipe You Will Ever Need
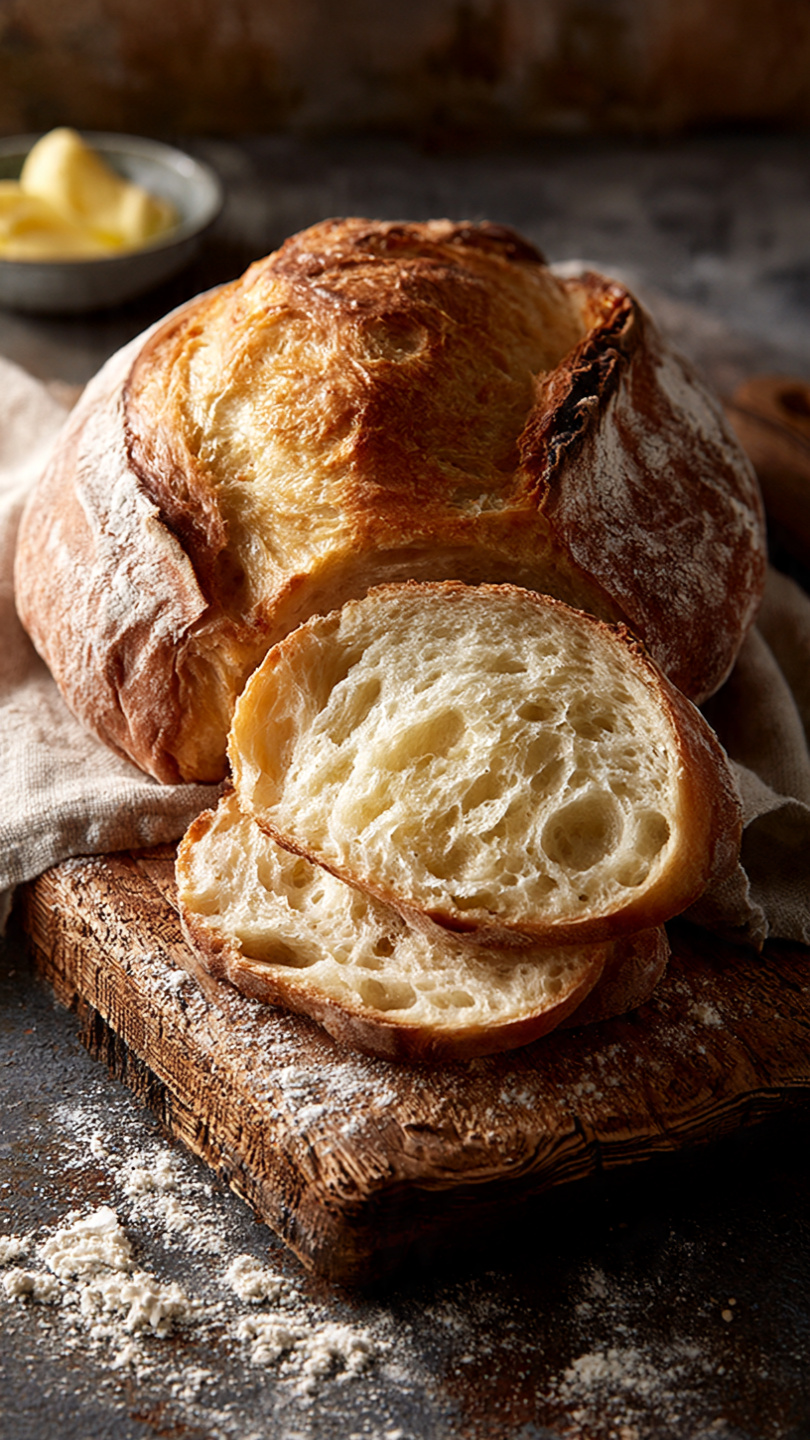
There is something almost magical about pulling a golden, crackling loaf of homemade Italian bread out of the oven. The crust shatters at the first touch. The inside is pillowy and tender with just the right amount of chew. And the smell warm yeast, toasted flour, a whisper of olive oil fills every corner of your kitchen.
This rustic Italian yeast bread recipe is the one I come back to every single week. It is not fussy. It does not require a bread machine, a starter, or years of experience. What it does require is a little patience and one piece of equipment that changes everything.
Using the right tools is genuinely what separates a pale, soft loaf from a deeply golden, crispy Italian bread with a crust that crackles like a good baguette. A heavy Dutch oven traps steam in those first crucial minutes of baking, mimicking the professional deck ovens used in Italian bakeries. It is the single biggest upgrade you can make to your homemade bread game.
Why This Artisan Italian Bread Recipe Works
Most homemade bread recipes ask you to choose between easy and good. This one refuses to compromise. Here is what makes it exceptional:
- Bread flour over all-purpose builds a stronger gluten network, giving you that chewy, satisfying pull that defines great Italian bread.
- A long first rise develops flavor without any extra work from you. Time does all the heavy lifting.
- The Dutch oven method creates a steamy environment that keeps the crust soft during oven spring, then crisps it up dramatically once the lid comes off.
- Semolina on the bottom adds a subtle crunch and prevents sticking far better than flour alone.
Chef's Tip: Do not rush the yeast proofing step. If your yeast does not foam within 10 minutes, it is dead and your bread will not rise. Fresh yeast is worth checking before you commit to the full recipe.
The Secret to a Crusty Italian Bread Crust
Every baker chasing that shatteringly crispy Italian bread crust is really chasing steam. Professional bread ovens inject steam into the chamber during the first phase of baking. At home, a preheated Dutch oven does the same thing automatically.
Here is the key: preheat your Dutch oven inside the oven for a full 30 minutes before the dough goes in. The moment that cold dough hits the scorching cast iron, it creates a burst of steam that:
- Keeps the outer skin of the dough soft and pliable so the loaf can expand fully.
- Gelatinizes the surface starches, creating that glossy, burnished crust.
- Locks in moisture so the crumb stays tender instead of drying out.
Once the lid comes off, the oven's dry heat toasts the crust to a deep, mahogany brown. That is your window for magic. Watch it closely and pull the loaf when it is the color of a well-tanned leather boot.
Tips for the Best Homemade Italian Bread
A few small choices make a big difference between a good loaf and a great one:
- Do not over-flour the dough. A slightly tacky dough produces a more open, airy crumb than a stiff one. Resist the urge to keep adding flour.
- Score generously. Use a sharp knife or bread lame and cut at a 30-degree angle for maximum bloom.
- Cool completely before slicing. I know. It is torture. But cutting into a hot loaf causes the steam inside to escape all at once, leaving the crumb gummy and dense. Wait at least 30 minutes.
Serving idea: Slice this rustic Italian bread thick and serve it alongside a bowl of good olive oil with cracked black pepper for dipping. It also makes transcendent bruschetta and the most glorious bread for mopping up pasta sauces.
Ready to bake? Here is everything you need, laid out step by step:
Rustic Italian Yeast Bread (Crispy, Crusty, and Homemade)
This rustic Italian yeast bread bakes up with a shatteringly crispy crust and a soft, chewy crumb — all from simple pantry staples and a Dutch oven. The easiest artisan bread recipe you will ever make at home.
Ingredients
- 3 cups bread flour, plus more for dusting; all-purpose flour works in a pinch
- 1/4 oz active dry yeast, one standard packet; instant yeast also works
- 1 1/2 tsp fine sea salt
- 1 1/2 cups warm water, between 100 and 110 degrees F to activate yeast without killing it
- 1 tsp granulated sugar, feeds the yeast; do not skip
- 1 tbsp extra virgin olive oil, plus extra for greasing the bowl
- 2 tbsp semolina flour, for dusting the bottom of the Dutch oven; cornmeal works too
Instruction
Proof the yeast: In a large mixing bowl, combine the warm water, sugar, and yeast. Stir gently and let it sit for 5 to 10 minutes until the mixture is foamy and fragrant. If it does not foam, your yeast may be expired or the water was too hot — start over.
Mix the dough: Add the olive oil and salt to the yeast mixture. Add the bread flour one cup at a time, stirring with a wooden spoon until a shaggy, rough dough forms. It will look messy — that is exactly right.
Knead until smooth: Turn the dough out onto a lightly floured surface and knead for 8 to 10 minutes until the dough is smooth, elastic, and slightly tacky but not sticky. You can also use a stand mixer with a dough hook on medium speed for 7 minutes.
First rise: Lightly coat a large bowl with olive oil. Place the dough inside, turning it once to coat. Cover tightly with plastic wrap or a damp kitchen towel and let it rise in a warm, draft-free spot for 1 to 1.5 hours, or until doubled in size.
Shape the loaf: Punch the dough down gently to release the gas. Turn it out onto a lightly floured surface and shape it into a round boule by folding the edges underneath themselves to build surface tension. Pinch the seam tightly at the bottom.
Second rise: Place the shaped loaf seam-side down on a sheet of parchment paper. Cover loosely with plastic wrap and let it rest for 30 to 45 minutes while you preheat the oven.
Preheat the Dutch oven: Place your Dutch oven (with its lid) inside the oven and preheat to 450 degrees F (230 degrees C) for at least 30 minutes. A very hot pot is the secret to a bakery-style crust.
Score the bread: Just before baking, use a sharp knife or bread lame to cut a few slashes across the top of the loaf about 0.5 inches deep. This allows the bread to expand properly in the oven.
Bake covered: Carefully lift the parchment with the dough and lower it into the scorching hot Dutch oven. Place the lid on and bake at 450 degrees F for 30 minutes. The steam trapped inside creates the crispy Italian crust.
Bake uncovered: Remove the lid and continue baking for 12 to 15 minutes more, until the crust is deep golden brown and the loaf sounds hollow when tapped on the bottom. The internal temperature should read 200 to 210 degrees F.
Cool completely: Transfer the bread to a wire rack and let it cool for at least 30 minutes before slicing. Cutting too early releases steam and makes the crumb gummy.
Equipment
- Large mixing bowl
- Wooden spoon or bench scraper
- Stand mixer with dough hook (optional)
- 5.5 to 7 quart Dutch oven with lid
- Parchment paper
- Sharp knife or bread lame
- Wire cooling rack
- Instant-read thermometer
Notes
Storing and Serving Your Homemade Crusty Italian Bread
This bread is truly best on the day it is baked, when the crust is at peak crispiness and the crumb is still slightly warm. That said, it keeps beautifully with the right storage.
At room temperature: Wrap the cooled loaf loosely in a clean linen or cotton kitchen towel. Avoid plastic bags entirely they trap moisture and turn that gorgeous crispy crust into something soft and chewy within hours.
In the freezer: Slice the loaf first, then freeze the slices in a zip-lock bag for up to 2 months. Reheat directly in a 375 degree F oven for 8 to 10 minutes no thawing needed.
Whether you are serving this as an appetizer with antipasto, using it to soak up a Sunday ragu, or simply eating a warm slice with salted butter, this rustic Italian bread recipe homemade is the kind of thing that makes people think you have been secretly attending baking school. Enjoy every crackly, pillowy, deeply satisfying bite.